Monday, July 12, 2010

Fresh Fruit Tart with Dark Chocolate and Pastry Cream


I have been known, a time or two, to give into a severe craving and make a beeline to the closest bakery available. It's usually late at night when, as much as I love to bake, can't quite convince myself that an hour of creating and a sink full of dishes is going to satisfy, and reward, my efforts.


One market I frequent always seems to have desserts on the higher end- you know, not just cream pies and spray painted confections. Quite honestly, here in the Arizona summers, a creme pie sounds less than appealing. If anything, nauseating.


One of the items I have tried and liked at that market was a fruit tart made with a pastry crust brushed in chocolate, a vanilla cream, and fresh fruit. While it was refreshing, some off the things I didn't care for was the heavy dose of sugar on the pastry- a huge crunch in every bite- and the glaze of unknown origin on the fruit itself. Oh, and the the $16.99 price tag was just a tad on the "don't you dare tell hubby you spent this much" side... Who, me..?


Thank goodness last week when the craving for this fruit tart hit, it was early enough in the day for me to think of how to recreate it more to my liking. While the recipe was inspired by my local Safeway bakery, the recipe I created on my own. A flaky puff pastry, spread with a premium dark chocolate, a thin layer of decadent pastry cream, with the best of the seasons fruit crowning the top.


Fresh Fruit Tart with Dark Chocolate and Pastry Cream

1 sheet of puff pastry, thawed in refrigerator
1 recipe Pastry cream (recipe to follow main recipe)
3 oz dark (bittersweet) chocolate, melted- I used Ghirardelli 60% Cacao
2 c strawberries, hulled and sliced
3 whole kiwi's, peeled, sliced down center and sliced into 1/2 circles
1/2 c blackberries
1/2 c blueberries
1/2 cup seedless blackberry preserves, heated in microwave for 15-20 seconds with 1 tsp of water

Place a 9" tart pan with a removable bottom onto a baking sheet. Carefully drape puff pastry into pan, cutting off excess at top. Dock the bottom of pastry. Bake for approximately 15 minutes at 400F, until pastry has risen slightly and is flaky. Remove from oven and let cool completely.

With an offset spatula, spread melted dark chocolate to within an inch of edge of pastry. Let cool.

Again with offset spatula, cover cooled chocolate with cooled pastry cream (recipe below).

In a decorative pattern, place sliced fruit on top of pastry. Brush fruit with blackberry preserves. Chill completely in refrigerator before serving. Serves 6 to 8.

Pastry Cream

1 c whole milk
1/4 c sugar
1/2 of a vanilla bean, split down center
3 egg yolks
2 Tbs flour
2 Tbs unsalted butter
1/8 tsp salt

In a small bowl combine the egg yolks and half of the sugar and whisk until the mixture turns a light yellow. Then add the flour and salt, mixing well. Set aside.

In a 2 qt saucepan place other half of the sugar, milk and vanilla bean on medium heat. When mixture begins to simmer well, take off of heat and carefully remove vanilla bean (dry and save for another use, such as vanilla sugar).

Very carefully and slowly add a small amount, about a cup, of the hot milk mixture to the egg mixture, constantly stirring, to temper the eggs making sure not to scramble. Once combined, add egg and milk mixture back to the pan over medium heat. Whisk the mixture constantly, making sure nothing sticks to bottom of pan. Bring mixture to the boil for about one minute, until mixture thickens. Turn off heat and add butter.

Place into a shallow pan to cool and cover with saran wrap so that a skin does not form.

Stumble Upon Toolbar

Saturday, July 3, 2010

Spiedies and summer memories


I have some fabulous memories of summertime growing up in New York. As a kid, our first hint of summer was when the Good Humor Ice Cream truck would start canvasing the neighborhoods, and the lot of us would scream at the top of ours lungs for him to stop. My favorite ice cream bar of all time was the Good Humor Candy Center Crunch. Somehow, I felt as if I had struck gold. Not only was I allowed to get an ice cream, but with the addition of this solid chocolate candy bar in the center, I felt extra special!

Summer also meant home grown tomatoes. My parent's loved to garden, and back there it seemed so much easier than here in Arizona. The soil was nutrient rich and dark. A huge turn from cement like red clay we have here.

My parents also loved to compete with the neighbors when it came to their tomato plants, especially who could grow the biggest. I remember one summer, about 1972, when the folks had my brother and I blow up red balloons and attach them to our plants. They had me pretend to water them while they took a Polaroid instant picture with one of those bright flash bulbs. Dad & Mom then had us run on down to the neighbors, boasting of our huge faux- 'mater plants, while they sat back laughing their tail ends off... We still crack up over it to this day!


But I have to say that for our family, in summertime, especially the 4th of July, meant one thing- Spiedies! Cubes of lamb, venison, beef or chicken are soaked in a vinegar, citrus and herb based marinade for a few days to a few weeks, then skewered and grilled over an open flame, and served on soft Italian rolls. They are a regional New York favorite, and about 26 years ago the Annual Binghamton Spiedie Fest was born.


While some may think it strange to marinade meats for a week or two at a time, it worked perfectly when using lamb or venison, removing any gamey traces, producing a tender, juicy end result. This here is my recipe, based upon family input and my childhood memories.

Spiedies

4 large bay leaves, coarsley crumbled
4 tsp oregano
5 cloves garlic, minced
3/4 c fresh lemon juice
1/8 c fresh lime juice
1/2 c good quality olive oil
3/4 c either red or white wine vinegar
1 tsp pepper
3 tsp kosher salt
3 lbs of either lamb, venison, beef or chicken- cubed
skewers
Soft Italian rolls

Combine all ingredients except meat in a large, sturdy Ziploc bag or bowl. Taste and adjust seasonings as necessary. Add meat. Let marinate at least 2 days, up to a week, in coldest part of fridge. Periodically stir ingredients. You will notice olive oil will slightly solidify. When ready to cook, remove from fridge and let come to room temperature before skewering. Grill to desired doneness, using caution not to overcook! If desired, bring remaining marinade to a boil for at least 7 minutes, and drizzle over spiedies. Enjoy!

Stumble Upon Toolbar

Tuesday, May 4, 2010

Deep Fried Ice Cream


Hard to believe that May is already here and that Cinco De Mayo is tomorrow. There are always many celebrations out here with amazing food, fabulous margarita's, and deep fried ice cream for dessert!


Yup, ice cream- deep fried! Vanilla ice cream, rolled in cinnamon and sugar, then a crunchy coating of crushed cinnamon cereal, and deep fried a few brief moments until golden brown.

The first time I heard of it was when I moved to Phoenix 32 years ago. I was a bit confused by the idea- how could you fry something that was supposed to be eaten frozen? Actually it's rather easy with a bit of prep and organization.


Something deliciously sinful happens in your mouth when you bite into this warm, honey drizzled, crispy, cinnamon- crunch coated vanilla bean ice cream. I can't quite explain... you'll just have to take a bite for yourself and see...


Deep Fried Ice Cream

2 large scoops Vanilla Bean ice cream
1/4 c sugar
1/2 tsp cinnamon
1 c cinnamon crunch cereal, crushed
Honey, to drizzle
Whipped Cream, to top
Vegetable oil, about 3" deep

Scoop out ice cream and place each scoop onto a cookie sheet, sides not touching, freezing again until nice and solidly frozen.

Mix together cinnamon and sugar. Roll each scoop of ice cream into cinnamon-sugar mixture until well coated. Immediately roll and coat ice cream in cereal, gently packing cereal crumbs into the ice cream. Re-freeze for about 30 minutes.

Remove from freezer and place one coated ice cream onto a slotted spoon. Gently place ice cream into hot, 375 degree oil for approximately 10 seconds (or less) until golden brown on all sides. Remove and drain quickly on a paper towel.

Place ice cream in a serving dish. Drizzle with honey, and top with whipped cream if desired. Serves 2.

These can be easily prepped in advance, freezing immediately. Deep fry as wanted!

Stumble Upon Toolbar

Sunday, April 25, 2010

More Than Whole Wheat Pancakes


My sister Lindsey and I have a huge distaste for store bought pancake mixes. We've always made buttermilk pancakes from scratch for our kids. They taste amazing. We know exactly what goes in them, and can pronounce every ingredient in them without a college degree.


Last year I had come across a whole wheat buttermilk pancake that was actually quite good. It was around the time of my Get Fit Challenge, and even though whole wheat is quite healthy, I felt I needed to adapt the recipe to make it fit in with the nutritional direction I was going in.


So I swapped out some ingredients with a few delicious ones I have fallen in love with. Agave Nectar has become my go to sweetener in place of honey for almost everything. It doesn't give a spike to your blood sugar like honey does, making it a great substitute if you are a diabetic.


Greek Yogurt has got to be just about the best thing ever created, and is an amazing swap for buttermilk in these pancakes. If you've never tried it before, you must. Rich and creamy, even the non-fat version will make you do a double take, making you wonder if you accidentally picked up a full fat version.


Now, I've never been one much to drown my pancakes in maple syrup. I prefer a simple dusting of powdered sugar and some orange marmalade...sometimes peanut butter. I just prefer the fresh taste of a fluffy home made pancake with a touch of sweetness- and fluffy these are, which can be difficult to come by in a whole wheat pancake.


It's unusual to find a whole wheat pancake that is not only nutritious, but delicious and kid friendly as well. This recipe may just find your kiddos waiting impatiently for theirs...


More Than Whole Wheat Pancakes


1 c whole wheat flour
2 tsp baking powder
1/2 tsp kosher salt
2 Tbs Agave Nectar
1/2 tsp vanilla extract
1 Tbs olive oil
1/2 c skim milk
1/2 c non fat Greek yogurt
2 eggs

In a small bowl blend together the whole wheat, baking powder, and kosher salt. Set aside.

In a large bowl whisk together the agave nectar, vanilla extract, olive oil, skim milk, Greek yogurt, and eggs.

Stir in the whole wheat mixture until just combined. Do not over mix.

Pour approximately 1/4 c batter onto medium hot non stick griddle, slightly buttered. When batter bubbles slightly and looks a little dry around the edges, flip and cook on other side until pancake has risen and is nicely browned.

Makes approximately 7 pancakes (4").

Stumble Upon Toolbar

Monday, April 19, 2010

Nation Food Bloggers Great American Bake Sale Success!


I can't think of any other time that I planned an event that wasn't stressful- they usually are. But this one was different. All the "cards" just sorta fell into place, and this past Saturday we had our long awaited National Food Bloggers Great American Bake Sale! We had a great time and a great turn out!


I can't begin to say enough good things about the great folks that hosted us, 5th and Wine, in Old Town Scottsdale, Arizona. Not only did they let us use all of the tables and chairs we needed, but let us have an entire room in the restaurant with it's own entrance off a main touristy intersection. Restaurant patrons were encouraged by the amazing staff to stop by our display after dining to purchase some goodies to take home. They even went so far to include the details of the event in a mass email to their customers, as well as promoting it on Facebook to their fans. Scott Yanni, the establishments General Manager, continuously made sure we were well taken care of at all times, and even had his own (huge!) family come to the event. Scott, I thank you from the bottom of my heart...


We had a fantastic raffle with donations of One hour Zoom teeth whitening and Sonicare Electric toothbrush from Harris Dental, two $25 Gift certificates from 5th and Wine, a $50 online gift certificate from DeMarco's Italian Specialties, a King Arthur Flour gift basket and a beautiful glass Apothecary jar filled with chocolates.


We met so many happy, joyful people excited to help and splurge on sweets for the cause. We also heard so many comments on not only the variety of the goodies we had, but their uniqueness as well. Lemon Basil Shortbread was one fabulous donation from a friend, Sharon, excited to bake for the cause. She said she lie awake at night trying to come up with something different, and let me tell you, they were fabulous!

For a couple years now I've been a huge fan of Arizona's own Food Hunters Guide to Cuisine, a fab blog for all things Tuscan and tasty. She helped tremendously behind the scenes, promoting and baking delicious Frosted Orange Bars, Lemon Ricotta Muffins (to die for!), amazing Mosaic Biscotti and more. It was a joy to meet her for the very first time at our bake sale!

My friend Kim made her signature Coconut, chocolate chip, and almond drop cookies, which are absolutely fantastic... I considered buying half even before the bake sale!

Through the Share Our Strength website a gal named Meg, here in Arizona, got a hold of me to find out how she could help. After making 125 brownies decorated with cute little bows, she drove them to my house, almost 40 miles one way, a couple days before the event!

Thanks to Andrea of All Caked Up, a local bakery within Dominics Bistro Italiano for providing some fabulous cupcakes and frosted Toll House treats as well. I still havent met Andrea yet, but if she is half as sweet as her mom, who raved about her baked goods, then I can't wait to meet her!

My friend Gail made dozens of Pizelles to my utter joy, and my mother in law, Lynda, made so many wonderful treats I considered keeping them for myself ;)


After reconnecting with a dear friend, Victor, from high school who is now located in Hawaii, I received an email from his wife, Vicki. They had a friend who had recently moved to Arizona who didn't know anyone, "is a prolific baker", and would I mind some help for the bake sale..?! We made a new friend that day in Sara, who has to have made the best Scharfenberger brownies I have ever tasted, and stayed to help all day with the sale.

Some months ago at the signing for the Pioneer Woman's Cookbook (that's me and my kidlet in the second photo down with Ree!), I happened to be Tweeting about the event while I was there, and met a sweet gal named Stephanie, a tweet addict as well, that just warmed my heart and entertained my little one with bubble gum. When she heard me tweet about the bake sale she volunteered to bake immediately. She stayed to help as well on Saturday, bringing Donut Pops, Neopolitan Mini Cupcakes, and the truly coveted French Macaron's in toffee and s'mores flavors....Mmmmmmm!

With the help of my mom, Marian, who handled taking care of the sale of goodies and raffles while us gals grabbed passer's by with some hoots and hollers, our team was able to earn just over $500 for Share Our Strength!


Thanks to all that came out to visit us on Saturday- purchasing, donating, encouraging, and keeping us laughing. We had a blast, and couldn't have had a sale without all of you!

Stumble Upon Toolbar

Thursday, April 1, 2010

National Food Bloggers Bake Sale


Did you know that even today, in the year 2010, that almost 17 million— almost one in four—children in America go hungry every day? It's hard for me to fully comprehend that number. Even in my worst of times, when things seemed impossibly lean, I can't say that I have ever known hunger. But millions of children do, right here in our own back yards.

I have joined hands with Food Bloggers everywhere who have partnered with Share Our Strength to help end childhood hunger in America by 2015. Together, on April 17th, Food Bloggers across the country will be having a bake sale to benefit Americas hungry children. All the funds raised here in our community stay here to benefit "our" children.

With our location generously donated by the fantastic folks at 5th and Wine, a fabulous restaurant and wine bar, Team LaDue and Crew will be hosting an amazing bake sale on Saturday, April 17th from 11 a.m. to 3:00 p.m. that will tantalize your taste buds! With exceptional Italian desserts provided by Andrea of All Caked Up, Theresa of Food Hunters Guide to Cuisine, Jennifer of Jennifer's Cooking Spot, myself, and many others, we know we have something to satisfy everyone's craving!

If sweets don't catch your fancy, no worries! Come out to visit us anyway for a fantastic dining experience and raffle prizes from the fab folks at 5th and Wine, Harris Dental, a King Arthur Flour gift basket and more! What..? You say you can't make it that day..?! Well how about joining our team behind the scenes! Leave me a comment with your contact info and I'll tell you how you can help!

I can't wait to see all of you on Saturday April 17th from 11 a.m. to 3:00 p.m.- Let's help Americas children!!

5th and Wine
7051 E 5th Avenue
Scottsdale, Arizona 85251
(480) 699-8001

(located west of the Horse Fountain at the corner of 5th Avenue and Marshall Way, right in the heart of Old Town Scottsdale)

Stumble Upon Toolbar

Tuesday, February 23, 2010

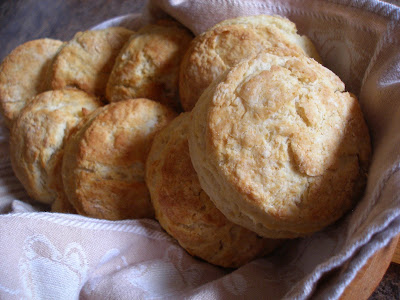
Edna's Cafe Biscuits


There is something just so comforting about a fresh homemade biscuit. Just out of the oven, steam rising off the top, bathed in butter. It can send you down memory lane in a few blinks of an eye.


In this day and age of everything from a can, and freezer to oven convenience, the art of making biscuits for dinner has largely gone by the wayside.

There was a time when making a stellar biscuit got a gal a husband, and heck, in the movie "McLintock" it even got Yvonne DeCarlo a job when Chill Wills handed John Wayne a biscuit she had made.


Over the last 30 years I have been obsessed with making the perfect biscuit. I've made some good, but many bad. I'd get the flavor right but then they would be too hard. Some were supremely tall, but tasted like aluminum because I had added too much baking powder.


Over time I'd make little notes in my cookbooks as to what I had liked and disliked about a certain recipe. The flakiness. The flavor. The crunch of that first bite. I found that two things stood out the most. Many recipes called for shortening. Maybe it's just me, but I've found that shortening leaves a coating and somewhat of an unpleasant taste in my mouth after I eat one containing it.

The other was the liquid ingredient. So many people love a buttermilk addition to many recipes, and generally I am one of those people. But I found that most often, like most people, I would have to use a substitute for it. Buttermilk is not something I usually keep on hand, and I really don't care for the powdered variety. I found though, that I actually preferred the flavor of lemon juice and whole milk combined, as a substitute for the buttermilk.


Thirty years is a long time to figure out how to make a biscuit. I'm happy to say now though that I am done. I don't care to peruse recipes for another, or jump when someone else says they have a great recipe. These are delicious. They are satisfying. They keep my hubby happy. Need say more?


Edna's Cafe Biscuits

3 c flour
1- 1/2 tsp sugar
2- 1/2 tsp baking powder
1/2 tsp baking soda
1/2 tsp salt, slightly heaping
1/2 c unsalted butter, cubed small and very cold
Scant 1- 1/4 cups whole milk
1 Tbs lemon juice


In a large measuring cup, add 1 Tbs lemon juice. Then add whole milk up to the 1-1/4 c mark. Mixture will start to curdle. Stir and set aside.

Combine the flour, sugar, baking powder, soda, and salt in a large bowl. Add unsalted butter and using pastry blender, blend until butter is the size of large peas. Add milk mixture to flour mixture and stir only until just combined. Place dough onto a well floured surface and pat out to a large square or rectangle, of about 1/2" thick. You can cut biscuits into squares with a knife, or use a round biscuit cutter to make approximately 9 to 12 biscuits. Pat together any remaining scraps and form into biscuits as well.

Spray a baking sheet with non stick spray and place biscuits on pan about 1" apart. Bake in a pre heated 425F oven for about 10 to15 minutes, depending on your oven, until light golden brown. Serve hot with butter, jam, honey, or whatever your heart desires. Me, I just like 'em plain. Enjoy!


Stumble Upon Toolbar

Saturday, February 13, 2010

Blue Corn Macarons with Prickly Pear Requeson Cream


Love is in the air, and it's time for Mac Attack 4- my contribution to my latest addiction, the French Macaron. Wanting to give my macs a bit of Southwestern flair, I thought long and hard about which ingredients I wanted to make them of, knowing that I wanted to steer very clear of the traditionally anticipated Valentines chocolates.


I really wanted to showcase ingredients abundantly available here in Arizona, yet used in a non traditional way. My first thought was to use mesquite flour, which I seem to find everywhere I go from mid summer to fall. That is when most local people harvest them from their own trees and and have them locally ground. Mesquite has a sweet, nutty flavor, which I felt would be a perfect mac companion. But none was available this time of year, and I really didn't feel like driving 30 miles to pay $12 for a pound at Whole Foods. If any local readers know of another place, please, do tell...


When I went into my pantry to gather ingredients one day for cornbread, as I was reaching for the bag of cornmeal, it struck me- blue cornmeal would be a fantastic addition to my macs, still keeping within my quest for the Southwest, and adding an interesting speckled color as well. I decided in addition to that, to flavor the macs with a cinnamon- vanilla flavored Mexican toasted barley drink, that is similar to Horchata, made most often from rice.


Everywhere I go in the Valley I see prickly pear cacti. Sadly, I don't even think of them as a food or ingredient much anymore, rather, an ornament for ones yard. But the fruit harvested here, when its little spines are removed, have a deliciously sweet, berry- melon like flavor, with almost a hint of spice. Flavor can also change, depending on where you live. I just thought it would be the perfect companion to my Blue corn macs. Blended with a fresh Mexican Requeson cheese (similar to ricotta), would make a rich filling even cupid would love.


Macarons are absolutely French, subtly elegant, and worthy of the finest establishment. No doubt about it. But here in the great Southwest, well, we just pull up a cactus, pour ourselves a margarita, and eat 'em on our patio ;-)


Blue Corn Macarons

3 Tbs Cebada con vainilla y canela (Barley with cinnamon and vanilla) mix
1/4 c ground almonds
1/4 c Blue Cornmeal
1-1/2 c powdered sugar
3 large egg whites- room temperature
5 Tbs granulated sugar
1 tsp vanilla

Prickly Pear Cream

3/4 c requeson (or ricotta, fully drained)
1/4 c prickly pear jelly
1 tsp unflavored gelatin

Place the almonds, blue cornmeal, cebada (barley), and powdered sugar in a food processor. Pulse until mixture is well blended and like a fine powder. You will still have some larger pieces of blue cornmeal throughout; that's okay. Sift once into a medium bowl and then set aside.

Place room temperature egg whites into bowl of stand mixture, and beat until foamy. At that point add vanilla, and slowly add granulated sugar, beating until shiny, but not stiff.

Add the cornmeal mixture to the egg whites, folding gently, yet mixing thoroughly, to be sure there aren't any lumps.

With a pastry bag, pipe 1" circles on a parchment lined baking pan, about 1" apart. Lightly tap pan on the counter to let any air bubbles surface and pop. Let piped macarons sit for about 15 minutes before placing in a pre heated 350F oven. Bake for 10 minutes, watching carefully, until you notice "feet" and the shells are hard. Let cool on parchment before removing.

For the filling:

In a food processor or blender, combine the requeson and the prickly pear jelly. Pulse until smooth, and well blended. Pour mixture (will be runny) into a small bowl. Then add 1 tsp unflavored gelatin to mixture, stirring well. Chill for 30 minutes.

Pipe or spoon filling mixture onto a single mac, sandwiching with another. Best when chilled for about 30 minutes.

Stumble Upon Toolbar

Sunday, January 24, 2010

Blood Orange and Jicama Salad


I adore the crunch and flavor of jicama. It's sweet, starchy, crunch is a nice change of pace from blah carrots and celery. It has zero fat and cholesterol, and fits in perfect with my commitment to #10in10: Ten Weeks to Healthy in 2010. Thanks to Lori over at Recipe Girl for putting together this challenge, there are now 336 participants from 41 states and 15 countries!


I first made this salad ten years ago, after seeing an episode on foodtv.com featuring Curtis Aikens. I loved it's freshness and simplicity. The crisp, pear-like jicama combined with the sweetness of orange, and the spicy edge of the jalapeno... a winning combination. If you're worried about jalapeno in this salad, don't. For the most part, once the seeds and membranes are removed, it retains the flavor but loses most, if not all, of its heat.


Originally this salad called for everyday oranges- and made that way is absolutely fabulous. However, when I was at my local market the other day, I came across these amazing blood oranges for $.19 cents each. They were so sweet and so pretty, and a gorgeous alternative to the original recipe.


With blood oranges at pennies, and the combined remaining ingredients coming in at just under $3.00, not only was this a very healthy salad, but an inexpensive one as well. Perfect for the #10in10 challenge!


Blood Orange and Jicama Salad
adapted from Curtis Aikens

1 jicama, peeled and julienned
3 blood oranges, supremed
1 small red onion, diced
1 jalapeno pepper, stem and seeds removed, minced (wear gloves!)
1 Tbs honey (I prefer orange blossom honey)
2 Tbs cilantro, chopped- I love cilantro, so I used more
Salt and pepper to taste- I only used a touch of salt

Combine all ingredients and chill. Best served when cold. Serves approximately 4 .


Stumble Upon Toolbar

Sunday, January 17, 2010

Chocolate Macarons with Chocolate Chili Cream Cheese Filling


Having taken an unannounced hiatus of sorts, I knew I had to come back from the holidays with a bang. What not a better way than to participate in MacAttack3, a virtual mac kitchen that was the brainstorm of Deeba and Jaime.


Having gotten to know Deeba via Twitter over the last year, I kept hearing her and many of my other Twitter friends getting ecstatic over these things called "feet"- the ruffley bottom, a sign of a perfectly "born" French Macaron. Monthly, the cries of joy, literally, from around the world, were like a wave through the Twitterverse, all full of happiness and parental pride. Supposedly, this little thing called a mac, simple in its ingredients, was a stubborn little mule.


So I decided to try my hand at the infamous mac a few weeks ago, using cardamom as my signature flavor. You know, Moi, the maker of custom cakes and all things fondantly difficult..? How difficult could a mac possibly be...pffft!

I ground the almonds. Try as I might they took forever to come to the consistency needed for a smooth batter. I whisked my egg whites and, for the very first time in my life, they refused to stiffen properly. I folded in my almonds and spice, battling the lumps with each fold. Finally, piping the mac batter onto a dark, non-stick liner, I placed them into the oven, certain that my macs would listen to their momma.

Not.

They baked all too quickly, and, while they had something resembling "feet", they were only a couple millimeters tall, too dark, and harder than the pan they rested on. Just like a difficult child.


After more encouragement from my Twitter friends, Deeba, Barbara, Paula, Renee, and Barbara, I decided to give it another go, this time using Paulas Chocolate Macaron recipe. The reason I chose her recipe, besides the fact that her macs are simply gorgeous, was simply because her recipe had all the conversions from grams to cups, which had been part of my prior difficulty, already done.

So today, on my second mac attempt, I gave birth to 20 pretty and perfect Chocolate Macarons with Chocolate Chili Cream Cheese frosting... complete with all their chubbby little "feet".


One prepared recipe of Paula's Chocolate Macarons
Chocolate Chili Cream Cheese Filling

4 oz softened cream cheese
1/2 tsp vanilla extract
1 1/2 c powdered sugar
1.5 oz StoneGround Guajillo Chili Chocolate (or your favorite chocolate)

In medium bowl whip cream cheese with vanilla extract until light and fluffy. Slowly add half of the powdered sugar until well blended. Set aside.

In a small microwave safe bowl, grate chocolate, preferrably with a microplane grater. Place bowl into microwave and heat, in 15-20 second increments until melted.

Add to bowl with cream cheese and beat until well incorporated. Slowly add remaining powdered sugar, mixing well, until a nice smooth (but not runny) consistency, adding more if necessary.

Spread mixture on the flat side of one mac, making a sandwich with another.

Makes approximately 20 Macarons.

Stumble Upon Toolbar